Planning a Squarespace Website: A Step-by-Step Tutorial
So, you're all set to dive into your Squarespace account (one of the best website builders, IMHO) to create your small business website, pick a template, start tweaking styles and layouts, and sell online right? It's an exciting prospect, but hold on a moment. There's a much smoother way to handle this.
Today I’m going to show you the exact Squarespace tutorial I go through when planning & designing Squarespace websites for my high-end 1:1 clients. No gate-keeping here!
If you’re on a DIY budget you can use this same Squarespace tutorial to radically shortcut the time it takes to get going with your new site AND set your site up for future success- including increased organic traffic, more leads, showing up in search engines, and higher conversion rates just like my 1:1 client, Bari:

The Pitfalls of a Haphazard Approach
With over a decade of Squarespace experience under my belt (my very first Squarespace site was built a solid 12 years ago!), and transitioning from novice to seasoned Squarespace website designer for small business owners, I've crafted numerous sites on this platform. In the early days, my process was a bit of a chaotic affair, to be honest.
Or should I say, it was more like no process at all.
This lack of a structured approach led to some less-than-stellar outcomes. My site's SEO descriptions were non-existent, loading times were sluggish, brand consistency was hit-and-miss, and the design process itself was often slow, and cumbersome.
But over the years, as I've fine-tuned my website design process, I've developed a comprehensive, step-by-step system that ensures no crucial elements are overlooked, and everything aligns with current best practices.
This clear-cut process means I can whip up a standard small business website in less than a week. I kid you not.
Believe me, having a well-structured website strategy in place even before you step into Squarespace not only saves you precious time but also ensures your final website is the epitome of your brand and business. It's a game-changer, trust me.
And that's why I wanted to get this Squarespace tutorial guide in your hot little hands.
How to Build a Small Business Website: a Squarespace Tutorial
Alright, let's dive into the nitty-gritty of building your Squarespace website. I'm going to walk you through this process step by step, using plain, everyday language – no fancy tech jargon here.
Benefits of a Refined Step-by-Step Guide and Coherent Website Strategy
This exact process is my bread and butter for every client project and personal website I tackle. It's tried, tested, and proven to deliver outstanding results.
I strongly recommend following these steps in the order they're laid out. This way, you won't miss a single critical element.
By adhering to this comprehensive plan, you're setting yourself up for a new Squarespace website that ticks all the right boxes. Here's what you can expect:
It will resonate with your target audience.
It adheres to the best practices of web design.
It's optimized for top-notch performance (and Google loves this).
We're covering everything from SEO and site speed to content flow and crucial business details. Plus, we'll handpick the perfect template tailored just for you.
Now, here's a crucial note: when you see "take action," I mean it. Stop, absorb, and implement.
Download your Free Smart Site Notion Planner
I'll be honest, just reading this guide won't cut it. To truly revolutionize your online presence, you need to put these steps into action. And trust me, the impact will be monumental.
To keep you on track and ensure you retain all the valuable insights, I've prepared a free Notion dashboard. You don't have to use the dashboard, but if you're already familiar with Notion, you'll know the beauty of having all your information and inspiration in one tidy spot.
This template gives you a designated space to organize all your 'action steps' and offers additional tips on how to seamlessly integrate these elements into your actual Squarespace site design.
It will become your indispensable sidekick throughout this process.
** Take Action: Download the Smart Site Planner **
Let's roll up our sleeves and dive in!
Step 1: Identifying Who Your Site Is For
First, let's pin down who your website is for.
This step is often underestimated, but it's the compass that guides all your decisions moving forward. It’s crucial to be clear on precisely who you want to connect with through your new website.
While personal style and voice play a role, it's not the whole picture. And what resonates with you might not be what resonates with your target audience.
Knowing these aspects about your ideal reader may not seem important from the get-go, but over time you’ll learn that this knowledge will greatly impact business decisions.
For instance, my ideal visitors are Creatives, Coaches, and Client-Based Business owners who are poised to diversify their revenue streams through both physical and digital products.
Their goal is to shift towards having 50% or more of their income generated from passive or scalable sources. This allows them to foster a flourishing and balanced business, free from the exhaustion of trading more and more of their time.
They require websites that can seamlessly accommodate a range of needs: from main pages to sales pages, and even shop or course pages. So I tailor my content and language to them.
The more you nail this step and make your website visitors feel like your business & website were made just for them, the more likely they are to take action & make purchases.
** Take Action: Fill out the first section in the accompanying Notion template. **
Or, fill out vital information for the following using your preferred digital doc or good ol’ pen and paper:
Gender & age range
Understanding the demographic details like gender and age range helps you visualize your ideal visitor and tailor your content to their preferences.
Location
Knowing where your audience is located can influence everything from language choices to product availability. It's a crucial piece of the puzzle.
Job/Industry
Understanding the professional background of your audience can shape the way you present information and position your brand.
Hobbies
Digging into your audience's hobbies gives you insight into their interests and passions. It's an opportunity to create content that truly engages.
Interests
Knowing what your audience is interested in helps you align your content with their preferences, making your site more appealing and relatable.
Struggles/challenges
Understanding the pain points and challenges your audience faces allows you to address them directly, positioning your site as a valuable resource.
Favorite shops & websites
Identifying the brands and sites your audience frequents provides valuable context for your own offerings and content.
Personal goals
Knowing the aspirations and goals of your audience helps you create content that supports their journey, fostering a deeper connection.
Reading habits
Understanding how your audience consumes content allows you to present information in a format that resonates with them.
Physical appearance & characteristics
Visualizing your audience's physical attributes can inform design choices and the way you present visual content.
Role models and online influencers
Knowing who your audience looks up to can offer insights into their values and preferences.
Social media usage and preferences
Understanding how your audience engages with social media helps you tailor your online presence to their preferred platforms and content formats.
You can also check out these posts for more information
Crafting a Website That Truly Resonates with Your Ideal Customer or Client
Most customer avatar exercises suck. This is what to do instead.
If you find yourself thinking, ‘Gee, I'm not entirely sure!’ – don't fret.
Take your best-educated guess for now, or consider glancing at the related post mentioned above, which offers additional guidance.
The essence of your business offerings should provide some valuable cues like the following examples:
Fitness Supplements: If your business specializes in fitness supplements, your target audience would likely be health-conscious individuals, fitness enthusiasts, and athletes. This group would benefit from clear, concise content and possibly detailed product descriptions.
Children's Books: If you're in the business of children's books, your target audience would be parents, caregivers, and educators. This group would appreciate vibrant visuals, easy navigation, and possibly resources for learning activities.
Pet Grooming Services: For a pet grooming service, your target audience includes pet owners who prioritize their furry friends' appearance and well-being. They might value clear pricing details, testimonials, and a gallery showcasing your grooming expertise.
Handcrafted Jewelry: If you create handcrafted jewelry, your target audience is likely individuals who appreciate artisanal, unique pieces. They might look for high-quality images, detailed product descriptions, and possibly a blog or story section detailing your creative process.
Look at your existing site's content for clues
If you're in the process of a website redesign and already have an existing website, perusing your current statistics and analytics can offer insights into your current audience. (Google Analytics is particularly effective for this purpose).
Your customer profile for your small business may change over time
Remember, your ideal visitor profile might shift over time, especially as your business expands. However, having a foundational understanding is crucial.
My own ideal visitor profile has undergone refinement as I honed in on what exactly I wanted to offer – and yours will too.
This doesn't have to be a rigid, one-off task. It’s a process that evolves, aiding you in gaining more clarity on your clientele as your business objectives and offerings progress and expand. So, take that first step with the information you have. As you engage with more clients and customers, and as your business flourishes, you'll gather more insights to refine and adapt accordingly.
Step 2: Focusing on your Website Goals
Next, We Need to Get Clear on the Most Vital Info Your Website Provides
Identifying the critical information your website offers is pivotal. Here are some examples:
Online Course Creators:
Example 1: Picture yourself as an online course creator. What critical information should your website provide? Visitors are likely keen on exploring your comprehensive course catalog, complete with detailed descriptions. They also want a clear breakdown of each course's curriculum and modules. Of course, pricing and payment options should be readily accessible. Additionally, showcasing testimonials and success stories will instill confidence in potential learners.
Digital Product Sellers:
Example 2: Now, envision yourself as a digital product seller. What key details must your website feature? Prospective customers will be eager to peruse a gallery displaying your products, each complemented by thorough descriptions. Since these are digital, ensure seamless download options for items like ebooks and templates. Pricing tiers and packages should be clearly outlined. Don't forget to spotlight customer reviews and ratings for added credibility.
Service-Based Professionals Expanding into Courses:
Example 3: Let's say you're a service-based professional venturing into course offerings. What crucial information does your website need? Clients will still want to know about your existing services like consulting and workshops. Additionally, they'll be interested in the new learning opportunities your courses provide. Real success stories from both clients and course participants will serve as powerful endorsements.
Membership Community Builders:
Example 4: Imagine you're focused on building a membership community. What must your website highlight? Prospective members will want a clear understanding of the community's features and benefits. It's vital to outline subscription tiers and access levels so they can make informed decisions. Exclusive resources and content should be presented enticingly. Lastly, member testimonials and transformations will give potential members a glimpse into the value they'll gain.
Workshop or Event Hosts:
Example 5: Now, envision yourself as a workshop or event host. What key information should your website convey? Participants will be interested in an accessible event calendar that lays out dates and registration options. Each workshop should have detailed information and a clear agenda. Pricing and package options should be transparent. To build trust, spotlight participant testimonials and reviews from past events.
Pinpointing your vital website information
If you're not immediately sure what your most vital info is, here's how you can find it:
Client Interaction: Reflect on the questions you frequently receive in your small business from clients, whether it's over the phone, via email, or in person. These queries often point to your vital information.
Analytics Insight: If you have an existing website, delve into your site's statistics to identify the most visited pages. These are likely the sections housing vital information.
** take action: In the Smart Site Planner under Step 2, jot down the crucial information your ideal visitors are seeking. **
Step 3: Gathering Inspiration
Now comes the fun part - gathering inspiration!
Think Like Your Ideal Visitor
When jumping into this step, remember, this is not about your personal preferences, but rather what resonates with your ideal visitor. Dive into their world; feel their vibes.
Pinterest: Your Creative Haven
With them in mind... Let’s jump into Pinterest. I find creating an inspiration board there is the perfect tool for this task. (You can also add a selection of the images you pin to the Notion planning template for easy reference.)
Crafting the Perfect Magazine World
What we're aiming for here is to encapsulate the essence and style of our ideal visitor in one place. I like to think of it as creating the perfect magazine world for them. They can’t help but pick it up, and then want to read it cover to cover in one sitting.
Beyond Pretty Pictures
Your inspiration board isn't just a collection of pretty images. It should also include colors, fonts, illustrations, graphics, and patterns that mirror the vibe of your ideal visitor.
Pins of Personality
You can pin images that embody what your ideal reader looks like, outfits that align with their style, and photos that exhibit textures, patterns, and colors that resonate with them.
Beyond Your Niche
Pin fonts and logos that resonate with their sense of style. But make sure to include logos or graphics that encompass all areas of their life- not just the ones related to your niche.
Expanding the Canvas
Expanding this way makes sure you create a more interesting “world” and this foundation will begin to set you apart from competitors in a similar niche.
Be Diverse in Your Curation
Feel free to go all out by pinning products they adore and snippets from the brands they hold dear.
A Holistic Vision
If you get stuck, go back to step 1 in the Notion template and pin things from each one of the areas you filled out.
Variety in Harmony
And remember, not every image has to be industry-specific. (In fact, it shouldn’t)
Paint the Full Picture
Do you educate people about the significance of healthy eating? Fantastic! Start pinning photos that convey the look and feel of a vibrant, wholesome life along with fresh foods and recipes.
Beyond the Obvious
However, don't confine yourself to only pinning things directly related to your business. Just because you educate about healthy eating doesn't mean every image on your board must feature someone enjoying a smoothie bowl.
Unveiling Patterns
Before long, you’ll start to see some patterns and themes develop- like similar fonts or colors- that will help you with the next step.
** Take Action: Create a Pinterest inspiration board using the guidance provided above. **
Step 4: Craft Your Brand Board
Now that you're armed with inspiration, it's time to curate the elements that will become your brand mood board.
First- what is a brand board?
A brand board is a visual representation of your brand's essence, acting as a guiding star for styling decisions on your website. Designers rely on it heavily for crafting the overall aesthetic.
Keep this brand board handy as you work on your website. This ensures your envisioned look is always at the forefront, guiding your design choices.
Here's a glimpse of brand boards I've created over the years for my clients and a brand board for this website from many, many years ago when it had a completely different look.


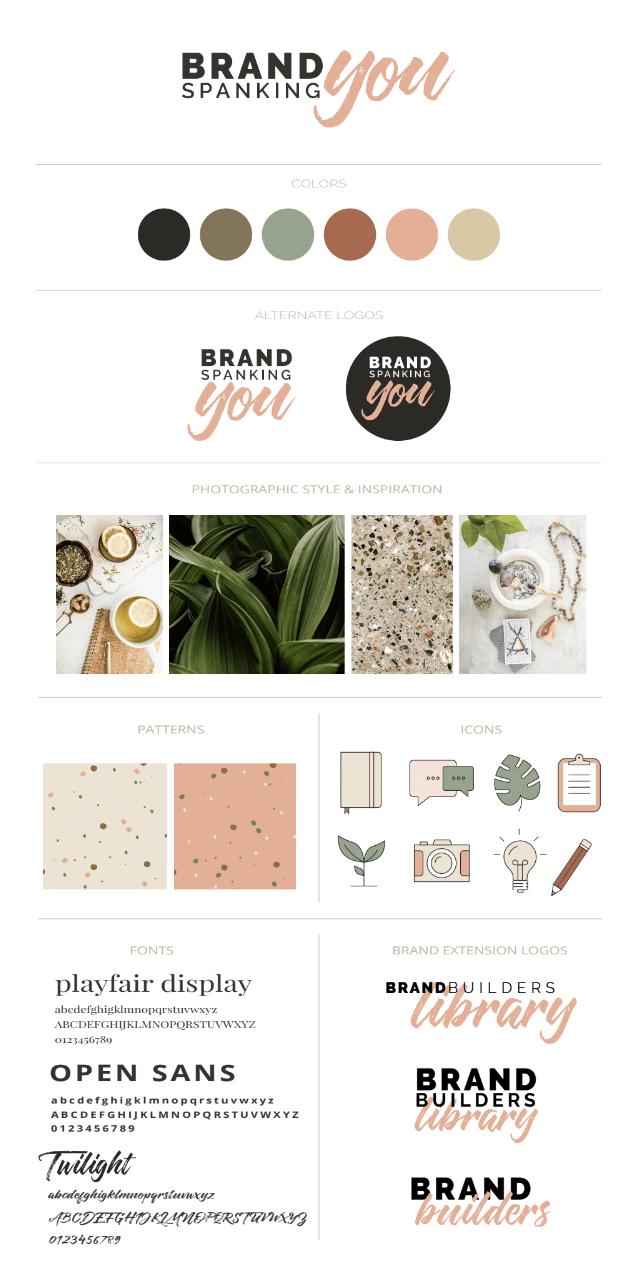
Key components to incorporate on your brand board:
Logo
Color swatches
Fonts
Social icons
Graphics
Textures
Patterns
Buttons
Inspirational images (gathered from the previous step!)
To ensure your brand board is spot-on:
Identify images that perfectly encapsulate your vision.
Select 4 to 8 images that are the embodiment of your brand.
Use these images to inspire your color palette too! Need some guidance? Watch the video below.
Worried about design tools? No problem! I've crafted a user-friendly Canva brand board template. It's a breeze to gather all your brand elements. Grab it here.
And if you need any help putting together your brand board, watch the quick video below walking you through it.

** Take Action: Utilize the Canva brand board template and the gathered inspiration from the previous step to forge your very own brand board. **
Step 5: Seek Business Website Inspiration
Now, let's delve into some website inspiration – exciting!
While it might be tempting to jump straight into this step, the groundwork you've laid ensures your website won't blend in with the competition. It'll stand out, a unique representation of your brand.
This phase is pivotal for pinpointing your website's essentials. The foundation you've built becomes invaluable when selecting a template and bringing your site to life.
Begin by seeking out websites that deeply resonate with you, then analyze them with a discerning eye. Identify the precise elements that captivate you.
Compile a list of several websites that truly speak to you, whether they belong to similar industries or entirely different niches.
Next, capture screenshots of the sections on these websites that strike a chord with you.
In the Notion template, you’ll find a dedicated section for this. Drop these screenshots in, and be sure to label each one with exactly what appeals to you about that specific aspect.
Avoid vague descriptions like 'I like the style'. Get SUPER specific.
Is it the shape of the buttons?
Perhaps it's the ingenious use of icon images.
Or maybe it’s the use of scrolling typography or borders on images.
Label these screenshots with precision.
** Take action: Add screenshots to the website inspiration area in the Smart Site Planner & name them accordingly. **
Step 6: Crafting Your Site's Structure
Now, let's dive into the heart of your website's organization. We're transitioning from ideas to implementation, making sure every section serves a purpose. This is the key to an efficient and captivating web design process.
Defining Three Crucial Aspects:
Content Curation: Begin by outlining the content that will feature on your site. A website without content is like a ship without a sail — it may float, but is it really going anywhere? Remember Step 2, where you defined what your site needs to communicate? This is where it all comes together.
Strategic Placement: Now, let's talk about 'where'. Where does each piece of crucial content belong? This is about more than aesthetics; it's about accessibility. If visitors can't find what they need, they won't stick around. Vital information should be a single click away.
Intuitive Navigation: Ever felt lost on a website? Crafting an intuitive navigation system ensures visitors easily find what they're looking for, following a path you've thoughtfully laid out.
The Significance of Clear Content Organization and Accessibility:
Your visitors are embarking on a journey through your digital world. Make it a pleasant one. Clear content organization forms the bedrock of a positive user experience.
Crafting an Intentional Website Navigation Route:
Imagine you're a tour guide leading your visitors. Consider the best way and order to experience your content.
For instance, if you're a business coach:
Begin by presenting your unique approach or methodology for working with clients. Follow this with your personal journey, especially if it resonates with your clients' challenges.
Provide reassurance of your credibility and your company's reliability. Testimonials or documented successes with previous clients are compelling.
Address the logistics of working together and whether it aligns with their budget. Then, guide them to take the next step, be it reaching out to you, investing in a digital resource, or exploring your expertise through a complimentary offering like a download or a pre-recorded masterclass.
Remember, each step of this journey should have a Call To Action (CTA) – typically in the form of a link, button, or image that invites the visitor deeper into the site's journey.
** Take Action: Let's create your site's structure by Mapping Out Your Website's Content, Determining Pages, and Navigation Titles **
Grab a pen, some paper, and sticky notes.
Label each piece of paper as a page on your website.
Take the content and vital information you've identified. Jot these essentials on sticky notes as placeholders.
Now, position these sticky notes on the corresponding pages. Vital information should be accessible within one click.
Consider what titles would serve your navigation best. These titles should be clear and concise. Your goal is to guide visitors to vital information with minimal clicks.
For design efficiency, less is often more in navigation options. Keep it concise and goal-oriented. If possible, limit your main navigation to 3-5 links.
In this phase, you're not just envisioning pages; you're choreographing a dance for your visitors, guiding them seamlessly through your digital world.
Remember, not every page needs to be part of this guided tour. We're focusing on the highlights, ensuring your visitors experience the essence of what you offer.
** Take Action: Once done, snap some photos and add them to the Smart Site Notion Planner for easy reference. If you're stuck, the Notion template includes some common "site map" examples. **
Step 7: Picking a Squarespace template
Fortunately, with the introduction of Squarespace 7.1 and the Fluid Engine updates (the latest version as of 2023), the concept of a "best template" is a thing of the past.
In this version, Squarespace has eliminated the distinction between templates and template families. Every Squarespace 7.1 site is now built on the same standardized template, offering a uniform set of functionalities. Unlike previous versions, where different templates had unique features, this is no longer the case with 7.1.
So, you might wonder why there are still various template options like Lusaka, Pulaski, Pazari, and more. These templates all share the same foundational structure, but Squarespace organizes them to help users choose layouts that align with their business type or aesthetic preferences.
Regardless of the template's name, they all offer equivalent capabilities in terms of layout possibilities, e-commerce functions, Member Areas, Courses, and more. This streamlines the decision-making process for new Squarespace users, making the template choice more about personal aesthetic preferences.
The good news is that you've already determined your brand's preferences, so go ahead and pick the template that closely matches your vision. This will make the editing process to suit your needs even smoother.
Step 8: Customizing Squarespace "Site Styles"
Now, let's bring out that brand board because we're delving into your site's styles. This upfront setup ensures your vision seamlessly transforms into reality.
Site styles serve as the blueprint for your Squarespace site's visual appeal. They provide precise instructions on how your content is displayed. As you integrate elements like images, text, buttons, and links, they automatically adopt the default style settings of your chosen template.
Here's the key: by personalizing fonts, colors, and buttons, you're infusing your site with its distinctive identity. This sets it apart from generic templates and gives it a unique edge in your field.
Squarespace offers two primary categories for site styles:
GLOBAL SITE STYLE CHANGES: These adjustments are made in your site's Design Panel. Changes here have a sweeping impact on the corresponding design element across your entire site. For instance, altering your button font universally applies this change, ensuring a unified look.
LOCAL SITE STYLE CHANGES: This type of modification is done within the on-page editor. Depending on the content, the settings may vary. Access it by clicking "Edit" on the page and navigating to Section Settings or Content Block Settings. Changes here are localized, affecting only the specific section or content block.
In this step, we'll zero in on GLOBAL site styles, refining fonts, colors, and buttons. By the end, your website will mirror the vision you set forth in your Brand Board.
Refer back to your Brand Board to identify matching or similar fonts in Squarespace or upload custom fonts to Squarespace if they're not available. While custom font uploading isn't covered here, it's an advanced option to explore.
Apply the chosen colors from your Brand Board using the HTML color codes for precision. These codes, starting with a #, define the exact color and shade you desire.
Unsure about your color codes? Watch the brand board tutorial video to locate them in your Canva document.
** Take Action: Visit the post using the Squarespace style editor and follow the steps to update fonts, colors, and buttons. Your site just took a giant leap to your Brand Board's vision **
Step 9: Optimizing Content for an Outstanding Website
Welcome to the final stretch! This step is a game-changer, streamlining your design process and ensuring your content appears in search results.
HERE ARE THE ESSENTIAL ACTIONS IN THIS STEP:
Keyword Research:
Delve into your ideal visitor's mind. What would they type into search engines to find services or products like yours? These are your target keywords. You'll use them for content, meta descriptions, headlines, and image descriptions.
For example, if you run a Chicago yoga studio, "yoga studio Chicago" is a crucial keyword. For niche cases, like a women's leadership coach in the beverage industry, you might target "women’s leadership training" or “beverage industry leadership programs”.
Tools like KeywordTool.io, Keywords Everywhere, Ubersuggest, and Google Keyword Planner help generate keyword ideas and reveal search volumes.
** Take Action: Add your main keywords to the Smart Site Notion Planner **
Craft a clear tagline:
Every business needs a concise one-liner summarizing its purpose, target audience, and location if relevant. Incorporate keywords people might search for. Effective taglines enhance clarity and SEO.
Examples:
Business Coach: "Guiding Entrepreneurs to Success"
Health Coach (Specializing in IBS Treatment): "Gentle Guidance for IBS Wellness"
Calligrapher (Teaching the Art): "Mastering Elegant Calligraphy"
Wellness Coach (Mindfulness and Stress Reduction): "Cultivating Calm through Mindfulness"
** Take Action: Add your tagline to the Smart Site Notion Planner **
Optimize images for speed and SEO:
Large image files slow website loading times and impact search engines and Google ranking.
Aim for images between 1500 – 2500 pixels wide and under 500 KB in size. Use tools like JPEGmini or tinyjpg.com for compression while maintaining quality. Rename images descriptively to aid SEO.
By following these steps, you improve user experience and boost search engine visibility. Remember, clarity and relevance are key!
** Take Action: Optimize website images and rename them with relevant key words. **
Organize content:
Centralize your content—text, images, videos. A Word document works solo, but Google Docs suits collaborative efforts. Create a dedicated image folder on your desktop or Google Drive.
There’s also a section in The Smart Site Notion planner to organize everything in one spot!
** Take Action: Organize your content in the Notion Planner**
Conclusion
Whew!! You did it!! With these steps, you've set the stage for a website that not only boasts a stunning design but strategically targets your audience. The upcoming task of integrating your content into Squarespace will now be a breeze.
Remember, your website is more than just a digital storefront; it's your brand's voice in the vast online landscape. By following this guide, you've ensured it speaks clearly to your ideal clients.
But we're not stopping there. Your website isn't an obscure work of art; it's a potent tool, finely tuned for success with Google and SEO. Your online visibility is about to soar.
As you progress, revisit this guide and its steps. Continuously refine and update your content to match your evolving business.
A website is never truly "finished." It's an evolving entity, growing with you and your business.
So, take this knowledge, this guide, let it launch your digital presence, and watch your website be the beacon that attracts your dream audience. Here's to your online success!


Meet Sarah
Sarah is an award-winning Designer, Creative Director & Brand Strategist for global companies turned entrepreneur. She’s passionate about empowering entrepreneurs & small business owners with tools and services that transform the way they build their brands and businesses.